Browsed by
Month: December 2018

Pet Christmas Cards

Pet Christmas Cards

For my last Christmas card post this year…

A good friend of mine, in fact the first person to see my blog, asked if I could make a few Christmas cards from pets to their owners.  I hadn’t done this before, but thought it sounded fun.  I don’t have a lot of animal stamps and I’m not an expert colorist, so I decided to use Christmas pet themed paper.  I was super excited when I saw the Recollections Christmas Pet paper pad at my local Michaels store.

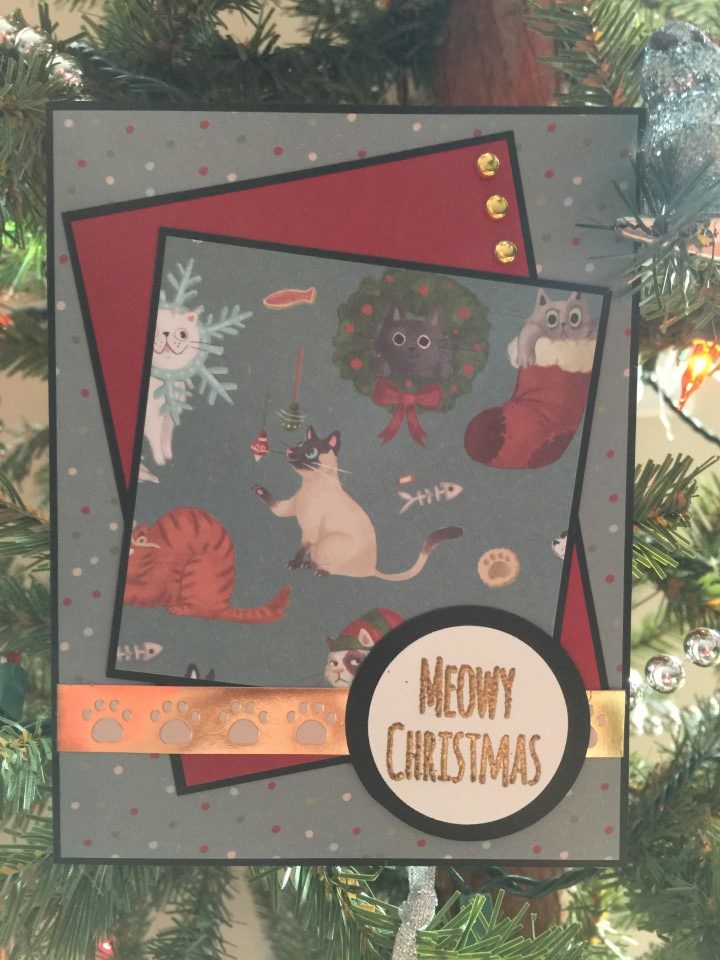
I liked the blue color of the cat themed paper, so started with the “cat” cards.  I used the dot pattern paper for the background and had the burgundy cardstock in my stash.  I tried to include as many complete cats as possible on each panel, so I did some “creative” cutting.  The paper pad included a sheet with several strips which could be cut and used separately.  I really liked the gold paw print strip and decided to use it.  To add some more gold to the card, I included a few small gold brads and heat embossed the “Meowy Christmas” sentiment in gold.

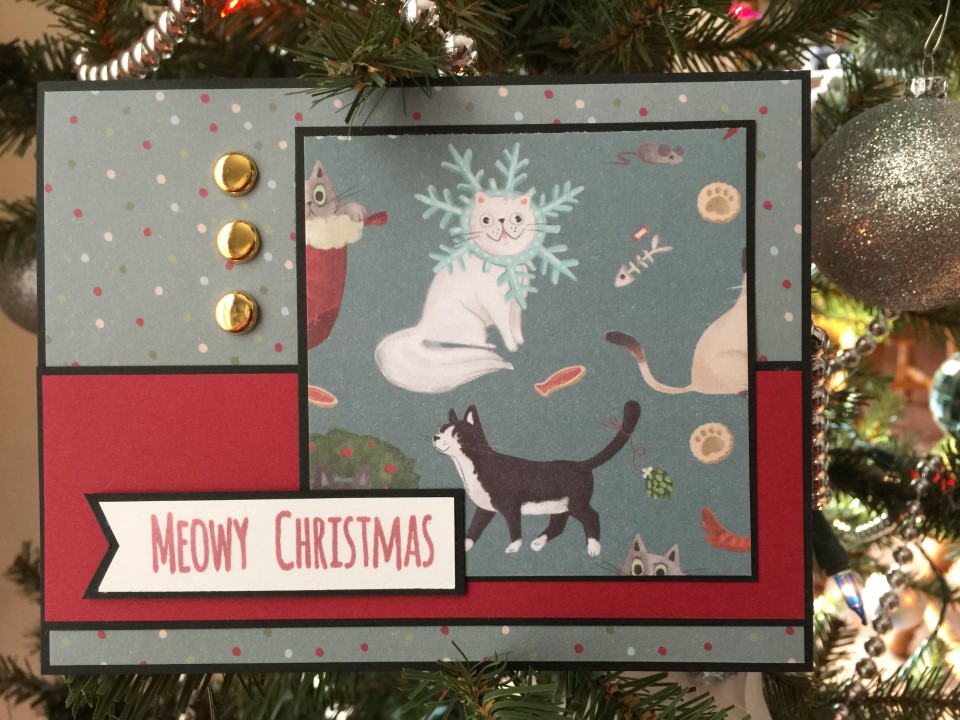
The cat with the snowflake was just too cute.  I wanted to make sure it was the main image on one of the panels.  I used the same dot pattern paper and burgundy cardstock.  I added a few large gold brads to the left side of the card and stamped the sentiment in burgundy ink.

The paper pad included several cut-aparts.  I thought the mischievous looking orange cat was really funny and immediately thought about adding rhinestones for the ornaments.  The cut-apart was quite large so I trimmed it down to a more card-friendly size.  I used gold washi tape to separate the pattern paper and pick up on the gold paw prints.  I added the red, blue and green rhinestones for the “ornaments” which gave the card some more sparkle and dimension.

And now for the “dog” cards…

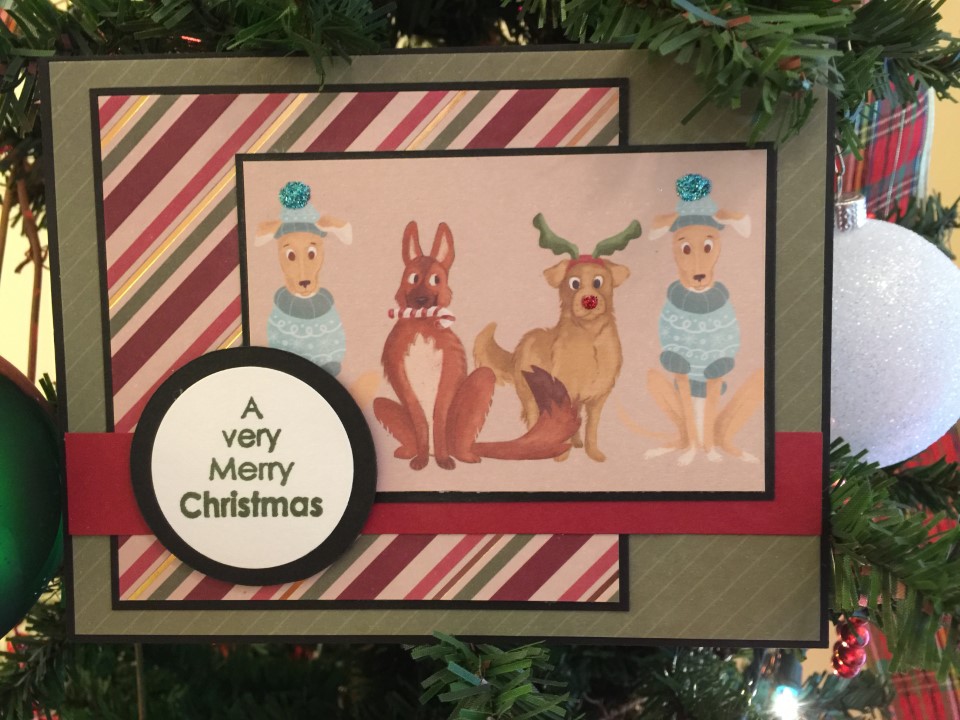
I used a green diagonal stripe paper for the background and the candy cane print for one of the panels.  The dog themed paper also included a sheet which could be cut into strips.  One of the larger strips included a row of dogs dressed in sweaters and reindeer antlers.  I cut the strip to include 4 dogs with matching dogs on each end.  To add some sparkle, I glittered the pom poms on the hats and the nose of the dog wearing the antlers.

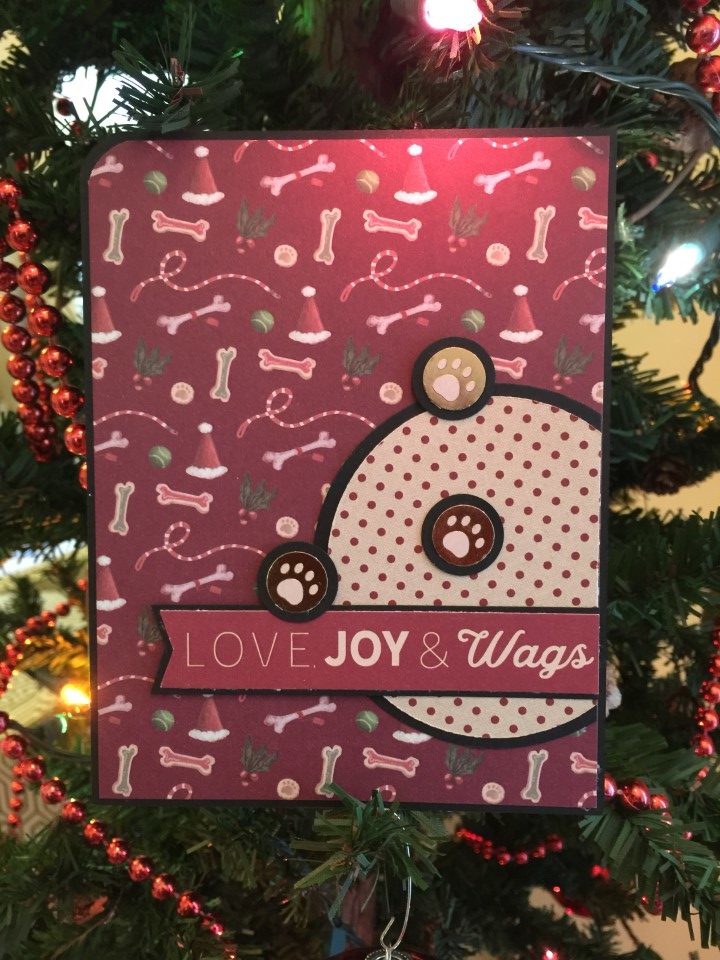
The next card uses the dog accessories printed paper.  I thought the Santa hats and red/green dog bones were fun.  To break up all the pattern I added a simple polka dot circle to the right side of the card.  For some sparkle I circle punched the gold paw prints and then added them as if a dog had walked across the card.

For the third card I used some more of the green stripe and dog accessories papers.  I don’t have a dog-themed Christmas greeting stamp, so I used one of the cut-aparts included in the paper pad.  I rounded the top of the cut-apart to follow the shape of the greeting.  To finish, I added a few burgundy brads to the bottom of the card.

I really liked the look of the first card, so decided to use some more of the paper strip.  This time I only included 3 of the dogs.  I separated the dog accessories paper and the green stripe paper with some twill ribbon.  I glittered the pom pom, nose and candy cane on the dogs.  And for a bit more sparkle, added a few rhinestones under the sentiment.

Supplies include:

  • Recollections Christmas Pets 12 x 12 paper pad
  • White 110lb paper (card base)
  • Recollections cardstock
  • Rhinestones
  • Martha Stewart glitter
  • Twill ribbon
  • Ms. Sparkle & Co. gold brads
  • Recollections brads
  • Tsukineko VersaFine Crimson Red ink
  • Tsukineko VersaFine Olympia Green ink
  • Tsukineko VersaMark Watermark ink
  • Gold embossing powder
  • Recollections gold washi tape
  • Cricut George and Basic Shapes cartridge


Christmas Cards Part 5

Christmas Cards Part 5

For the final 6 cards in my 30 card “collection” I used the My Mind’s Eye Cozy Christmas 6×6 paper pad and the DCWV Christmas Creations 12×12 paper pad.

The first card uses the glittered polka dot and gift print paper from the Cozy Christmas paper pad.  To separate the papers I added some decorative edged black ribbon.  As both papers already have some glitter I added just a few small red rhinestones.

The second card used some more of the Cozy Christmas red and green ornament paper.  I used the last of the dark green cardstock for the top piece of the card and separated it from the printed paper with some gold washi tape.  To add some more gold to the card I added a few gold brads above the washi tape.

For cards 27-30 I used the DCWV Christmas Creations paper.  I’ve had this paper for ages but had only used a few sheets.  The papers are all a bright red and green.  For the first card I selected green ornament paper.  Since this is a larger print I chose a layout that would use a bigger piece of the paper.  The sentiment stamp was perfect for the card as the “o” in the “Happiest of Holidays” is an ornament.

For the next card I used a Christmas plaid paper.  I again chose a simple layout which used a larger piece of the printed paper.  I added a strip of green dotted paper and wrapped it with a red ribbon.

The next card used some more of the green ornament paper.  I matted the paper with red cardstock and used the greed dotted paper for the background.  After adding the sentiment I thought the card needed a little sparkle so I added red rhinestones to the centers of 3 of the ornaments.

For the final card I used another large piece of the plaid paper.  I added a red cardstock and a green dotted panel to break up the plaid.  I then chose a longer sentiment and popped it up over the smaller panels.  As a final touch I added a few red sequins.

This was a fun project to work on.  I enjoyed getting to use a lot of the different papers and stamps in my craft room.  Also, as all of the cards were different I was able to try out many new layouts and found a few that I think will become favorites.

Some of the supplies used for these cards include:

  • Recollections cardstock
  • DCWV cardstock
  • White 110lb paper (card base)
  • Tsukineko VersaFine Olympia Green ink
  • EK Success Corner Rounder
  • Scotch Advanced Tape Glider (ATG)
  • Tonic Studios Tim Holtz 12.25 inch guillotine trimmer
  • Misti Precision Stamping tool

Embellishments include:

  • Rhinestones
  • Ms. Sparkle & Co. Gold brads
  • Offray lack ribbon
  • DeNami red ribbon
  • Recollections gold washi tape
  • Red sequins
Christmas Cards Part 4

Christmas Cards Part 4

For cards 19-24 of my Christmas card project, I used a few different paper collections – My Mind’s Eye Cozy Christmas 6×6 paper pad, My Mind’s Eye All is Bright 12×12 paper pad and Making Memories Mistletoe 12×12 paper pad.

I used My Mind’s Eye Cozy Christmas paper for the first 2 cards.  I used 2 stamp sets to create the sentiment panel for the first card.  A Fiskars border punch was used to create the scallop edge on the green paper.  I added a few rhinestones for some sparkle.  The second card uses the same Cozy Christmas paper.  I kept the layout simple and added a decorative edged black ribbon for interest.

I switched to the My Mind’s Eye All is Bright and Making Memories Mistletoe papers for the next 2 cards.  The first card used 3 printed papers.  I think the colors and patterns of the paper in these 2 collections coordinate nicely.  I used the Happy Holidays paper for the sentiment panel and added a few gold brads.

The next card used the holly and starburst prints and pearl finish cardstock again.  I decided against adding any additional embellishments and instead “colored” the ribbon print on the holly paper with Wink of Stella.  It gave some subtle shine to the card without taking away from the pearl cardstock.

For the 5th and 6th cards in this set I pulled out some paper that I’ve had in my stash for ages and have no idea where it came from.  I really liked the non-traditional colors.  The paper for the first card had several larger lavender snowflakes.  I knew I would be covering up some of the paper with the sentiment and circle panels, so tried to figure out the best way to cut the paper and leave the most snowflakes.  To finish the card I added a bit of lavender glitter to highlight the snowflakes.

For the last card in this set, I used a couple of the printed papers.  Although both papers are a busy print, I think separating them with some lavender ribbon made it work.  For some sparkle, I added light blue glitter to a few of the snowflakes and the dots on the striped paper.

Some of the supplies used for these cards include:

  • Recollections cardstock
  • American Crafts Pearl cardstock
  • White 110lb paper (card base)
  • Tsukineko VersaFine Imperial Purple ink
  • Tsukineko VersaFine Olympia Green ink
  • Memento Bamboo Green ink
  • EK Success Corner Rounder
  • Fiskars Border Punch, Scallop
  • Scotch Advanced Tape Glider (ATG)
  • Tonic Studios Tim Holtz 12.25 inch guillotine trimmer
  • Misti Precision Stamping tool
  • Cricut George and Basic Shapes cartridge

Embellishments include:

  • Rhinestones
  • Gold brads
  • Wink of Stella
  • Celebrate It black ribbon
  • Martha Stewart glitter
Christmas Cards Part 3

Christmas Cards Part 3

For the 3rd set in my 30 card “project”, I continued to use My Mind’s Eye Cozy Christmas paper.  I also dug out the Making Memories Mistletoe and My Mind’s Eye All is Bright 12×12 paper pads from my stash.

For the first card I used the Cozy Christmas glittered polka dot and village scene paper.  The sentiment I chose had a few stars so I added red glitter to coordinate with the stars on the village scene paper.

The 2nd card used a very traditional red and green ornament pattern paper.  I used stamps from 2 different stamp sets to create the sentiment panel.  To separate the ornament and stripe paper I used some red cardstock and a parentheses border punch.

The 3rd card used some more of the ornament paper and a strip of the Christmas plaid paper.  For the stripe across the card I used dark green cardstock and gold washi tape.  To pick up on the washi tape I added a few small gold brads around the sentiment circle.

I then switched to the Mistletoe and All is Bright paper pads.  I really like the cardinal paper and used it on 2 cards.  I did some “strategic” cutting to make sure I included as many complete cardinals as possible.  For the first card I embossed the burgundy background using the Cuttlebug Swiss Dots embossing folder.  For some shine, I added Ranger’s Glossy Accents to several of the berries on the cardinal paper panel.

For the next card I kept it very simple.  I cut 2 panels from printed paper and 1 panel for the sentiment.  I matted everything using black cardstock.  And again added some Glossy Accents to the berries on the cardinal paper.

The last card in this set used paper from the Mistletoe paper pad.  I pulled out some cream color pearl finish cardstock from my stash which matched the holly and starburst paper perfectly.  To add some “weight” on the right side of the card I added a chiffon ribbon and bow.

Some of the supplies used for these cards include:

  • Recollections cardstock
  • American Crafts Pearl cardstock
  • White 110lb paper (card base)
  • Tsukineko VersaFine Onyx Black ink
  • Tsukineko VersaFine Olympia Green ink
  • Tsukineko VersaFine Crimson Red ink
  • Memento Bamboo Leaves ink
  • Fiskars Border Punch, Parentheses
  • Scotch Advanced Tape Glider (ATG)
  • Tonic Studios Tim Holtz 12.25 inch guillotine trimmer
  • Misti Precision Stamping tool
  • Cricut George and Basic Shapes cartridge

Embellishments include:

  • Ranger Glossy Accents
  • Ms. Sparkle & Co. Gold brads
  • Rhinestones
  • Offray black ribbon
  • Recollections gold washi tape
  • Martha Stewart glitter
Christmas Cards Part 2

Christmas Cards Part 2

For my 2nd set of cards in my 30 card “project”, I started with the My Mind’s Eye Cozy Christmas paper and switched to the Recollections Jingle Jolly paper again.

For my first card I used the aqua snowflake paper as the background and the red floral paper as the main focal point.  I added some darker paper for contrast and a few rhinestones for a bit more sparkle.

The second card uses red polka dot paper as the background.  The paper is very sparkly as all the “dots” have a glitter treatment.  The printed paper is a bit busy (has a faint text print in the background) so I kept the layout simple and added just a ribbon for an embellishment.

The next card used up the last of the aqua snowflake paper.  The main focal point is the village scene paper which has a glitter treatment on the Christmas tree stars.  To keep the card from being all rectangles, I fishtailed the end of the sentiment banner.

The forth card only used 1 pattern paper.  I added the red panel to pick up on the berries in the wreathes.  The green strip across the card was a bit plain so I added a couple stripes with some gold washi tape.  To finish the card I added a few gold brads.

I then switched to the Recollections Jingle Jolly paper and made a couple more cards.  I used the snowman paper again.  To separate the pink cardstock from the snowflake pattern paper I added a silver glitter washi tape strip.  And for some more sparkle I glittered the band and pom poms on a few of the snowmans hats.

For the next card, I used the stocking paper and stuck to a simple layout.  For a little sparkle, I added a few pink rhinestones.

Some of the supplies used for these cards include:

  • Recollections cardstock
  • DCWV cardstock
  • White 110lb paper (card base)
  • Tsukineko VersaFine Onyx Black ink
  • Tsukineko VersaFine Olympia Green ink
  • Memento Bahama Blue ink
  • Scotch Advanced Tape Glider (ATG)
  • Tonic Studios Tim Holtz 12.25 inch guillotine trimmer
  • Misti Precision Stamping tool

Embellishments include:

  • Rhinestones
  • Ms. Sparkle & Co. Gold brads
  • Celebrate It black ribbon
  • Recollections silver glitter washi tape
  • Recollections gold washi tape
  • Martha Stewart glitter