Spellbinders Joyful Christmas Card Kit
Recently Spellbinders had a warehouse sale and I just couldn’t resist. I was tempted to get their Colossal Cardmaking Bundle (7 complete card kits) but managed to stay in control and only picked up 3 kits along with some stamp and die sets. I did purchase an extra 6×6 paper pad that coordinates with 1 of the kits. Spellbinders kits always include a huge amount of ephemera (die cuts, stickers, chipboard, etc.) and I wanted to make sure I had enough paper.
With the holidays coming up I decided to work with the Joyful Christmas kit, Spellbinders November 2021 card kit of the month. I usually start a kit by making the card on the instruction sheet but as I was flipping through the paper pad I really liked the sheet music and decided to start with that. I paired it with the soft pink diagonal stripe paper and some pale pink and gold metallic cardstock. The kit includes cardstock but as I only needed small pieces I just used some pink and gold scraps from my craft room. For some more pink I added a poinsettia ephemera piece and to go along with the music theme I added the ballerina. A couple of pink/gold bell enamel dots finished the card.

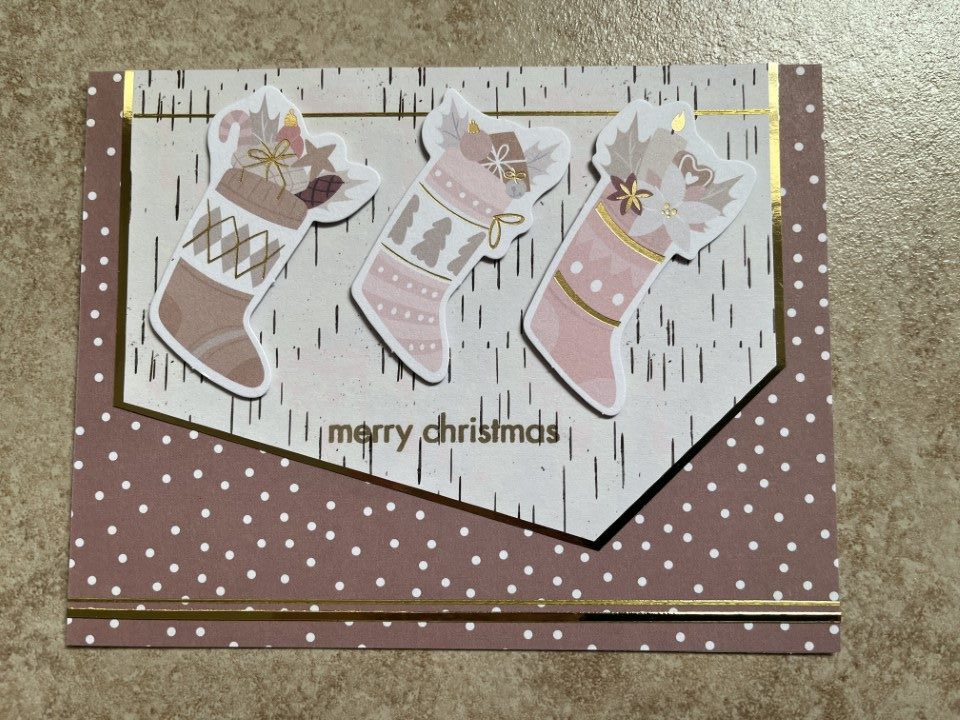
There were several Christmas stocking ephemera pieces included in the kit. I thought it would be fun to use several together and “hang” them as if they were on a mantel. I used the wood bark print for the asymmetrical focal panel and matted it with gold metallic cardstock. Since the stocking needed something to “hang” from I added a gold Love from Lizi peel-off towards the top of the panel. For some dimension I popped up the stockings. To bring some gold to the lower portion of the card I added a couple more gold Love from Lizi peel-offs. There didn’t seem to be a good spot to add a sentiment panel so instead I stamped “Merry Christmas” directly onto the focal panel under the stockings.
As the first 2 cards were very pink I switched it up with the next card. I was going to use the pine tree paper as the vertical strip but once I laid out the ephemera pieces the print was too busy and the ephemera didn’t really stand out. Instead I swapped the papers and used the pine trees as the background and the more muted wood bark print for the vertical strip. There’s just enough of a print to add interest but not so much that the pine tree and cute animal ephemera pieces get lost. Instead of matting the vertical strip, I added gold Love from Lizi peel-offs that pick up the gold foiling on the ephemera and the background paper. A few snowflake enamel dots that were included with the kit and a simple sentiment completed the card.

I liked the poinsettia print paper but found it to be a bit busy. To tone it down I paired it with a horizontal stripe paper and added a large sentiment panel. To keep the card from being too flat I popped up several of the poinsettia and foliage ephemera pieces on the corners of the sentiment panel and added some sparkle with a gold Love from Lizi peel-off and a few of the gold/pink enamel dots.

And now back to a pink card… The ballet print paper was really cute but I had already used the ballerina ephemera pieces. After sorting through the remaining ephemera (there is still a ton left) I found the nutcracker and the swan. I couldn’t decide which to use so I used both of them. I matted the ballet paper, leaving a wide border, on some gray cardstock from my craft room. The bottom panel is the remaining stripe paper left over from the first card. A strip of gold metallic cardstock separates the top and bottom panels. To keep the ephemera pieces from blending into the ballet paper, I added them to a large circle die cut from white shimmer cardstock. For a sentiment I used one of the puffy sentiment stickers included in the kit.

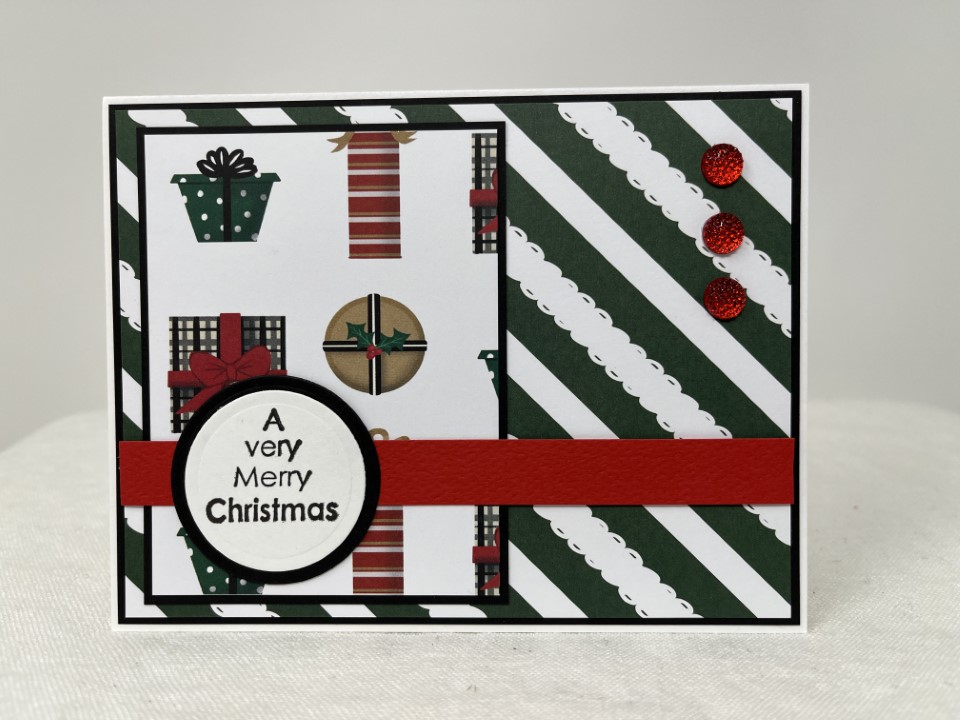
Even after making 2 of each card I still have tons of supplies from the Joyful Christmas kit and I haven’t even used the die set yet. In looking at the Christmas cards I have made so far many of them are non-traditional colors. Since most people tend to like the standard red/green colors and traditional images I am going to move on to another collection, but I will definitely come back to the Joyful Christmas kit. Also, Spellbinders Colossal Cardmaking Bundle is still available and it’s getting pretty hard to resist especially since several of the kits would be perfect for Valentines and spring cards.