Spellbinders Truly, Madly, Deeply Card Kit
I decided I should get going on some Valentine cards, or at least something that had a “Love-ish” theme. I started by pulling out a Recollections paper pad that I’m trying to use up, but… the papers and colors (everything was pink and red) just weren’t working for me. So after a couple cards I switched gears and pulled out a Spellbinders card kit.
Yes, I gave in and ordered Spellbinders Colossal Cardmaking bundle – 7 card kits! By holding out a few more weeks, I was able to purchase the bundle at a reduced price. Yay! And since I know the kits come with a ton of ephemera I used the “extra” money to order a few paper pads (also on sale) that coordinated with some of the kits.
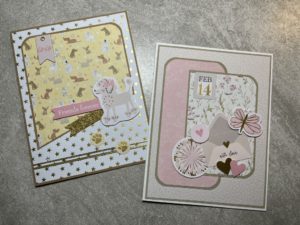
The January 2022 kit, titled Truly, Madly, Deeply, is a pretty pastel love-themed kit. While there are pinks, hearts and a few February 14th references, the bulk of the kit is not Valentine specific and can be used any time for any audience (kids, adults, masculine, feminine). This kit was one where I was able to purchase an extra paper pad. So for my first batch of cards I decided to just focus on the ephemera and use the stamps and dies with the second paper pad. As usual, I started by making one of the sample cards shown on the instruction sheet. I’m guessing you can tell that the sample is the card on the left. LOL. First off, the background paper isn’t layered and secondly, there is a lot of ephemera (9 pieces!) used on the card. I think it’s a beautiful card and the ephemera combination isn’t something I would have come up with. The second card is definitely my creation. It only uses 4 pieces of ephemera and a few sequins. Also, all the paper is matted. I like this card as well, it just has a “cleaner” look.
I used a couple card sketches for the next 2 cards. Other than the Love from Lizi peel-offs along the bottom, I followed the sketch fairly closely for the first card. There’s a chipboard sticker in the upper left corner and I dismantled one of the tag embellishments and used the glitter piece as a banner under the sentiment ephemera. Even with the peel-offs, the bottom of the card looked a bit bare. The paw print ephemera filled in some space and went with the paper theme. For the second card I focused on the ephemera (7 pieces). I think I picked out a mix of images that works well together in both color and theme. To make this card Valentine specific, I added the small “Feb 14” banner. To give the card a little dimension, I added some foam tape under a few of the ephemera pieces. The Spellbinders kit includes foam squares but I opted to use foam tape from my craft room that is a bit thinner to ensure the card can be mailed without requiring extra postage.
For the next set of cards I decided to skip some of the matting, like with the sample card. I choose paper combinations where the colors and prints provided good contrast. I continued practicing my use of ephemera and included at least 7 pieces on each card along with a few sequins. Both cards turned out well with enough ephemera for interest but not too much to make them over the top. I especially liked the ephemera collection on the card on the right. To me it felt most like the sample card.
At this point I had several 2×6 inch scraps of paper. Instead of saving them to the end of the paper pad I decided to find a sketch to use them now since I had already worked with some of the paper combinations. I ended up selecting a simple layout that would lend itself well to adding several pieces of ephemera. For both cards I went with the “more is more” approach and added more ephemera and embellishments than the sketch indicated. I quite like how they both turned out, with the card on the right being one of my favorites.
I have discovered that using ephemera requires a different mind set. I wouldn’t describe my style as clean and simple, but I do think it has a more streamlined, linear look. Figuring out how and where to add ephemera so that it doesn’t look contrived and overdone is definitely a skill requiring practice.
As I worked through about half of the paper pad, I began to find it harder to work with the remaining paper and ephemera. Instead of “forcing” the process, I decided to put the kit away for now and can go back to it another time. Afterall, I still have 1 complete paper pad and even though I used multiple ephemera pieces on each card I still have most of the tag embellishments, glitter foam stickers, chipboard embellishments, sequins and about 1/2 of the die cuts left. And I haven’t even used the stamps and dies.


